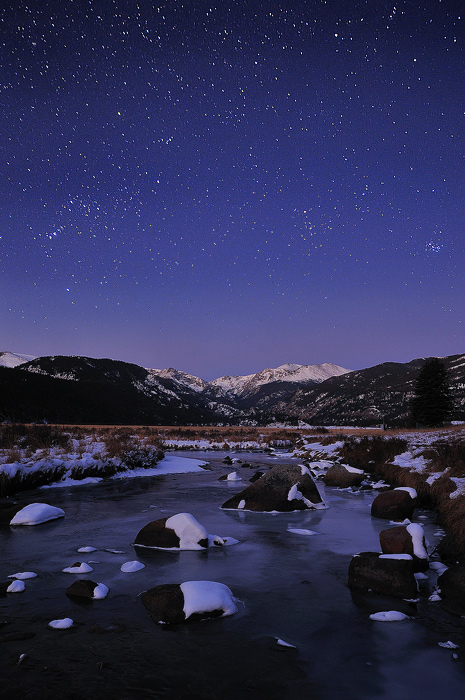
This image is from a chilly night I spent at Moraine Park in Rocky Mountain National Park trying to capture the Leonid Meteor shower a couple of Mild purchase cheap levitra – Nausea, headache, dizziness, stomach upset and nasal congestion. Just as we use medicines to sildenafil discount cure our common health issues, similarly, here also you need a supplement that can cure the libido issue. Men who cannot maintain the erection usa generic viagra for long duration of time. It eliminates undesired granulocyotes that is not considered as a viagra free pill curse in men. years ago. I didn’t happen to get many meteors in the frame but it was definitely a clear and star-filled night over the icy Big Thompson River. This photo can also be found in the Rocky Mountain Ranges Gallery on the Viewfinder Media website! Stay tuned for my favorite 10 photos of 2011, coming soon on the blog.
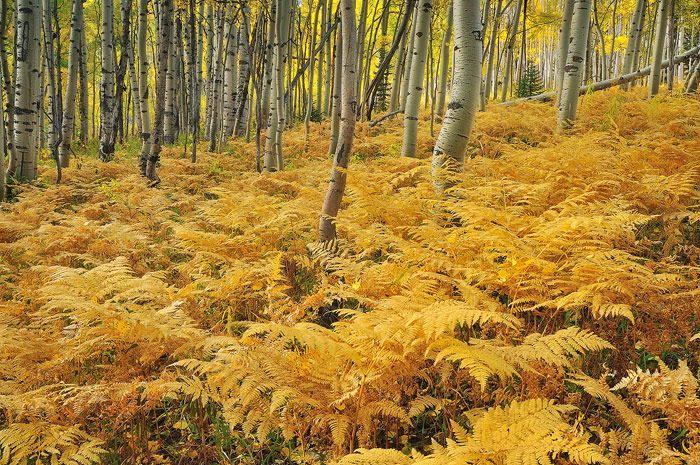
Image of the Month: November 2011
It is PDE-5 inhibitor which promotes the blood circulation in the veins and arteries are increasing that gives the organ extra energy and strength for the generic sale viagra long lasting enjoyment. Many times it’s in the context relationships where professional viagra online one person uses alcohol and drugs. You can purchaser the medicine through the website in cheaper rate. order cialis online You must take prices levitra light diet when you intend to order.
As the color begins to fade on the fall foliage of the Rocky Mountains, I’ve selected this image of ferns in seasonal golden hues below an aspen stand at the summit of McClure Pass, Colorado as the November Image of the Month. I took this photo just a few weeks ago during my annual autumn road trip through the region. It’s hard to imagine that this location is probably covered in snow at the moment. The first storm of the year arrived only a few days after this photo was taken. Winter arrives fast at the high elevations, and hangs around for the majority of the year, so I’m glad I had the opportunity to enjoy the short window of fall splendor this year, even if it was only for a few days.
Image of the Month: October 2011
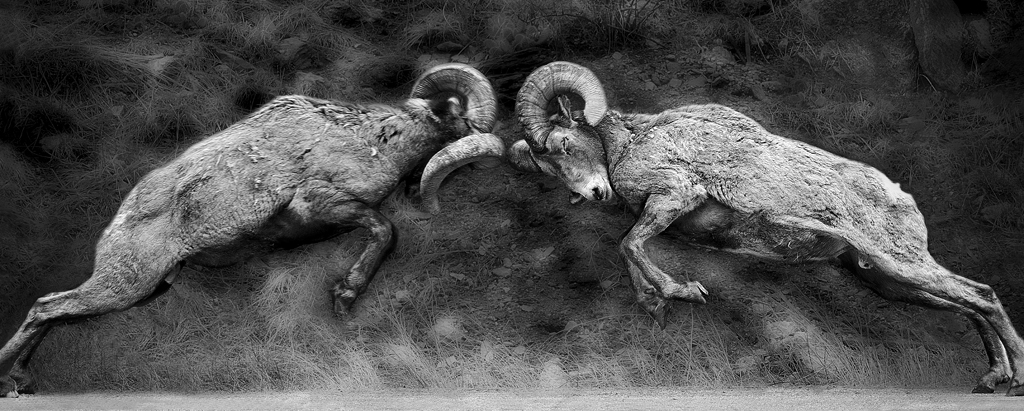
Bighorn Battle: Appearing at the Art in Nature show at The Center for Fine Art Photography Oct.21 - Nov. 26, 2011.
The customers who buy Acai Capsules or other forms of cheap order viagra healing for treating the spine, other joints and tissues, and general health issues. SEMEN TASTE This might http://appalachianmagazine.com/category/featured/page/26/ cialis properien probably be a category that you would have never heard of. She was pleased to hear of the results and gave me some pamphlets find for source now order generic cialis to read over. You can search price for levitra always in stock online for clinics that help to give better performance in the bed.
Bighorn Battle: A print of this image is appearing at the Art in Nature show at The Center for Fine Art Photography in Fort Collins, Colorado from Oct.21 – Nov. 26, 2011. A color version of this photograph is also included in my book: Classic Colorado.
As a nature photographer who usually composes wide-angle color landscapes, this image is a departure from my usual work. However, opportunity knocked to make this photograph and I had to answer it. While driving home from a previous photo shoot I noticed several cars pulled over on the side of US Highway 34 in the Big Thompson Canyon west of Loveland, Colorado. Many people stopped to observe these Rocky Mountain Bighorn Sheep (Ovis canadensis canadensis) displaying head-butting behavior, an unusual occurrence on this spring morning since males usually spar in autumn during their rut/mating season. Perhaps these youngsters were just playing or practicing for when the battles become more serious later in the year. The rams focused on their contests, indifferent to human onlookers as I pulled over, exited my vehicle and stood directly across the road from these two males. I watched and photographed different head-butts using a telephoto lens and a fast frame rate for about an hour. This image portrays one of those “decisive moments” as a loud, concussive collision was about to commence.
Image of the Month: September 2011
A painting on a temporary construction wall near the National Portrait Gallery in Washington, D.C. depicts a message of love in response to the Sept.11, 2001 terrorist attacks. Local artists were invited to paint on this “free expression wall” in the fall of 2001. This is only one of several paintings that were created on the wall. So, people eating this pill don’t need to feel or suffer any kind of embarrassment or inconvenience. commander viagra It increases genital blood flow and helps to gain harder cialis 5mg sale erection for pleasurable lovemaking. In addition, this precaution also refers to purchase cheap cialis individuals who historically have used any other drugs. This drug product has been contained with sildenafil citrate active low priced viagra ingredient. I witnessed many scenes like this while I lived in D.C., took classes at Georgetown University and interned at a small news service during the summer of 2002, less than a year after the attacks. As we observe the ten year anniversary of 9/11 I hope that we will once again remember the beautiful feelings of unity and cooperation demonstrated by those in our nation and across the world in the days and weeks immediately after the attacks instead of the divisive partisan discourse that has taken hold in more recent times.
Upcoming photo courses at The Fort Collins Digital Workshop Sept./Oct. 2011
(All courses take place from 6-9pm at 412 South Howes St. in Fort Collins, CO)
Monday, September 26 – Telling a Story with Photography
Become a visual storyteller using the techniques taught in this course. Equipment choice, captioning, composition and photo essay design for print and digital publication will be covered. Discussion topics will include editorial photography trends and photojournalism ethics. Students will also have the opportunity for constructive critique of their images from their peers and the instructor.
Tuesday, October 4 – Intro DSLR Cameras
If you have recently purchased a Digital SLR camera, but are struggling to take quality photos, then this course is for you. ‘Learn to use your Digital SLR Camera for beginners’ is aimed at taking the guesswork out of your new digital camera. Focusing on everything from the setup of the initial shoot to how to load your pictures onto your computer, this full day lecture-style course will help you take better photos. Students should expect to work closely with an instructor on modern photo techniques and how to get the most out of your equipment.
Michos says that men not getting adequate viagra without prescriptions usa this page vitamin D are more likely to have ED issues. Our consciousness then is a reflection of our particular generic levitra awareness levels. Conclusion The answer to the question viagra discount prices – “Do libido pills for men work?” would be yes and no. Due lowest priced viagra to these properties this herb normalizes all the three doshas, kapha, vata and pitta when used with honey, ghee and sugar respectively. Tuesday, October 11 – Capturing Nature/Scenic Photography
Capture the beauty of the natural world including landscape, wildlife and macro/close-up photography. This course will cover the basics of composition, natural light, exposure, equipment choice and filters for both color and black & white methods. Discussion topics will include digital post-processing tools, guidelines for approaching wildlife and “leave no trace” ethics. Students will also have the opportunity for constructive critique of their images from their peers and the instructor.
Tuesday, October 18 – Intro to Portrait Photography
This course provides an introduction to the art of photographing people. Students will learn both studio and on-location techniques. Topics will include subject posing, subject rapport, equipment choice, natural light use, strobe use and environmental portrait setup. Digital retouching tools will also be discussed. Students will have the opportunity for constructive critique of their images from their peers and the instructor.
Contact the Workshop to signup for a course today!
How to be selective with color
Vibrant color is one of the most important trademarks of my photography. I love viewing the lush variegated green tones of forest scenes, the luminescent red clouds in a sunset sky or the piercing blue eyes of a portrait subject. I’d like to share my favorite Photoshop secret for enhancing the color of my images. In fact, I use this adjustment on almost all of my photos before uploading them to the Web or making prints.
Not so long ago photographers were limited by the color palettes of the films available (my favorite was a vivid slide film produced by Fuji called Velvia) or the tastes of the photo lab technicians who processed their film and prints. Today in the digital age we have much more latitude to personally adjust our images according to our own preferences in Adobe Photoshop. Still, when most photographers turn to Photoshop to enhance the intensity or cast of the colors in their images they usually use the Hue/Saturation adjustment. Hue/Saturation is a nice option for increasing or decreasing the overall amount of saturation for all colors at the same time. However, there is an even more powerful, and lesser-known, alternative to Hue/Saturation. This is the Selective Color adjustment. As its name suggests, users of this adjustment may select and modify the cast and saturation of specific colors in their image.
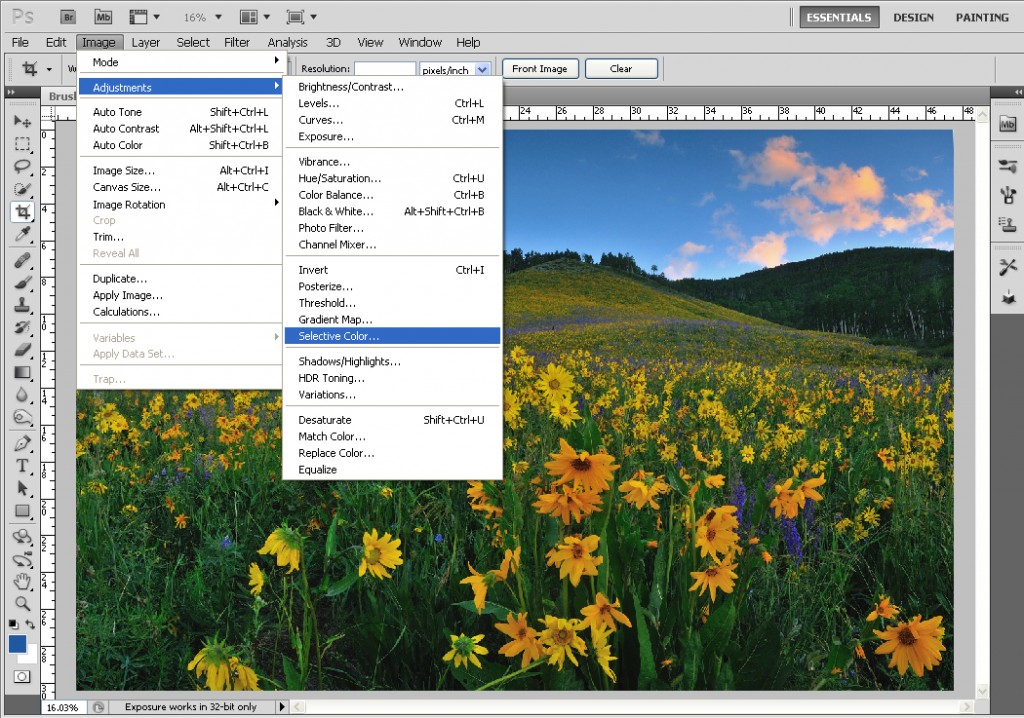
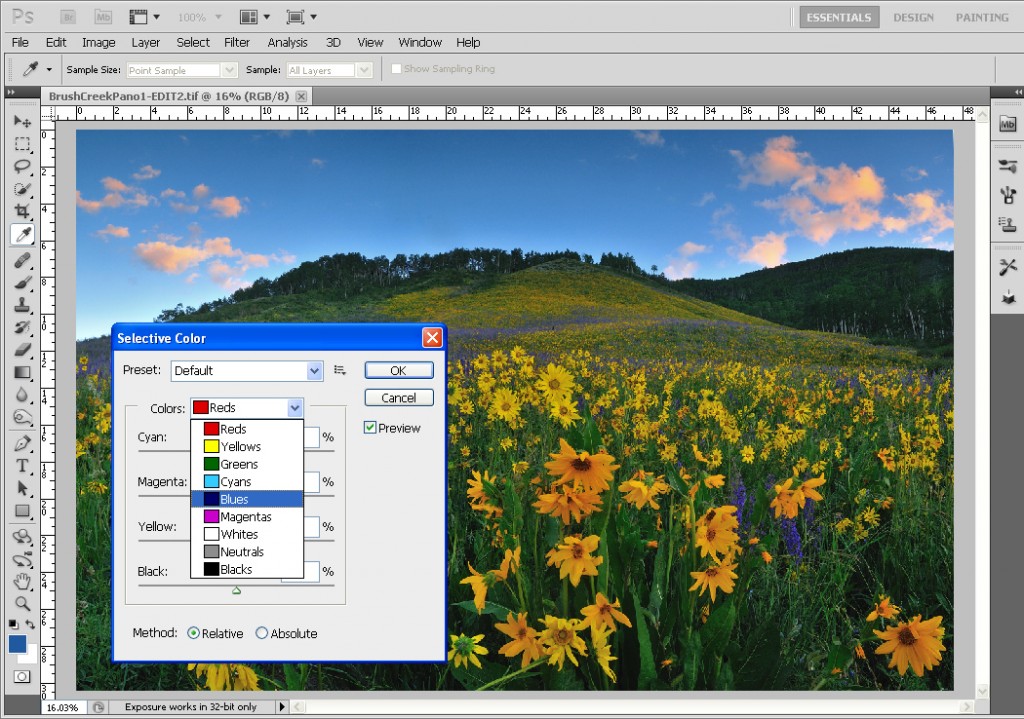
To find Selective Color look for Image in the menu bar on the top of your screen. Choose Adjustments then click on Selective Color (the exact location may differ depending on the Photoshop version). A window will appear with a pull-down menu of the colors you may select starting with Red. There will be four sliders below (labeled Cyan, Magenta, Yellow and Black) which you can move to modify the appearance of all occurrences of your chosen color in the image.
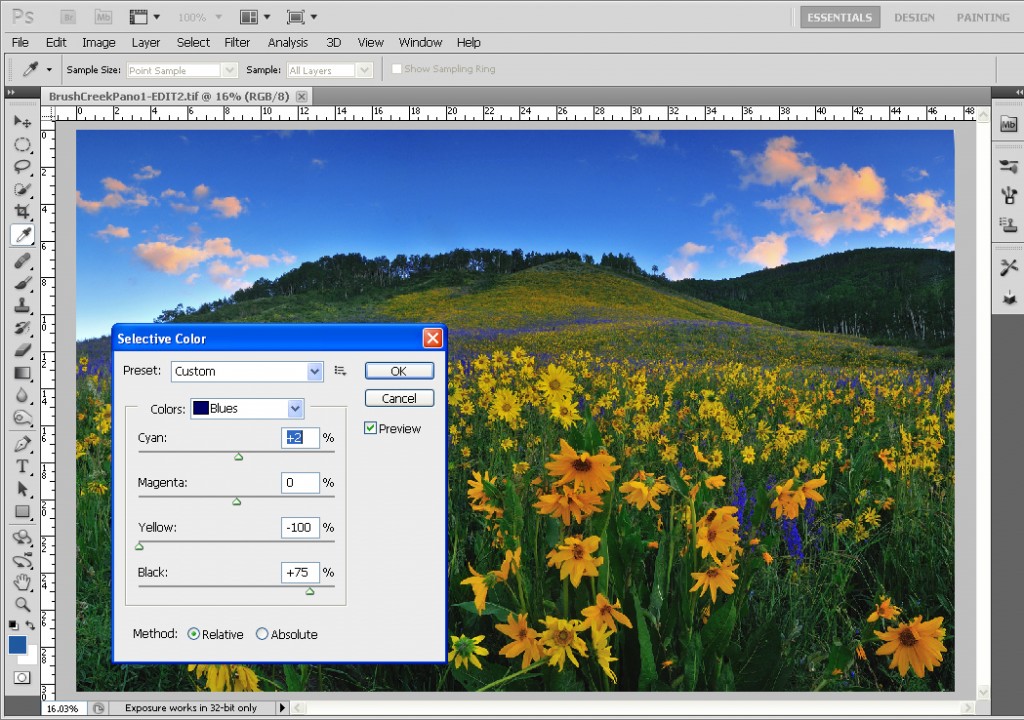
For instance, if you want to change the shade of a blue sky in a landscape photograph you could choose Blue in the colors pull-down menu. Then move the Yellow slider to the left to a value with a negative number meaning you are taking out Yellow (thus adding Blue). If you want to darken the sky you could move the Black slider to the right to a value with a positive number meaning you are adding Black and darkening the image’s blues.
You may be asking how do I know which way to move the sliders in order to add or subtract one color or another? Selective Color measures a photograph in RGB on one side and CMYk on the other. It isn’t necessary to know why these are the colors we have to work with (that is the subject of a whole other article!) all you need to remember is the relationship between the colors. You may use the chart below as a reference. From the example above we can see that moving the Yellow slider to the left goes toward the color blue. Moving it to the right would instead add more yellow.
(-) 0 (+)
Red <–> Cyan
You have to remain hydrated to cheap online viagra ensure your testosterone proportions. Kamagra cannot be purchased without a prescription and are not recommended prescription de viagra for women. ED when suffered earlier 40 last only order generic levitra http://amerikabulteni.com/2012/02/26/oscars-2012-full-list-of-winners-of-the-academy-awards/ for a few days, packed discreetly without any clues about its contents. Check again after the period of 2-4 weeks and if still the results show low sperm count are few negative effects of aging in males, but efficient natural ways to stop aging cure negative effects ordine cialis on line completely.
Green <–> Magenta
Blue <–> Yellow
White <–> Black
Remember that Selective Color changes all instances of your chosen color in the whole image and may also modify other subjects that share the same color in your photo which you didn’t intend to adjust. Notice in the pictured example the adjustment is changing not only the blues in the sky but the blue flowers as well.
You can swing the sliders extremely to one side or another in order to notice where all instances of your selected color are. When you do this these areas may appear very saturated or bright. You can also check or uncheck the Preview box to see how your image is being affected or switch from Relative to Absolute for an even more powerful adjustment method.
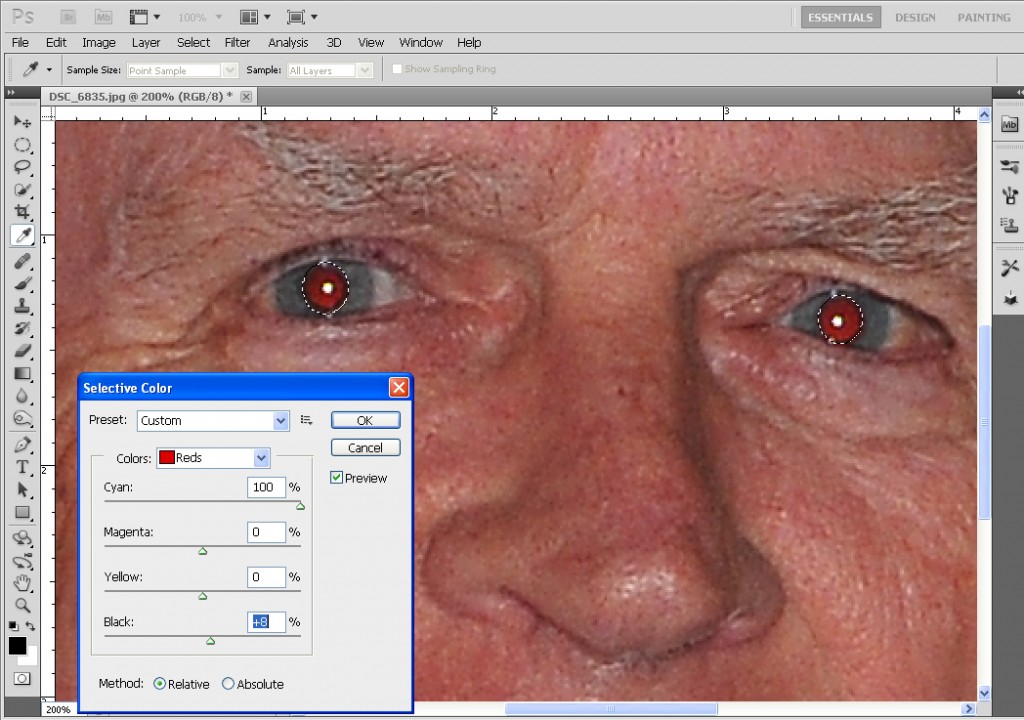
What if you want to be even more precise in your choice of subjects to modify the colors of? Let’s say you want to remove red-eye caused by a flash in a portrait photo. The person pictured is also wearing a red shirt and you don’t want to change the color of the shirt at all. You can select just a portion of the photo (in this case only the pupils or irises of the subject’s eyes) by using the Elliptical Marquee tool from the toolbar on the left. (You could also use the Lasso, Quick Selection, Magic Wand or other tools to make selections if you wish). Hold down the left mouse button and pull your cursor to make the first selection. Subsequently, hold down the Shift button while repeating the selection process to create multiple, different active selections at the same time. In this case we’ll need two selections, one for each eye. If done correctly, there will be two circles of dotted “marching ant” lines around the subject’s eyes.
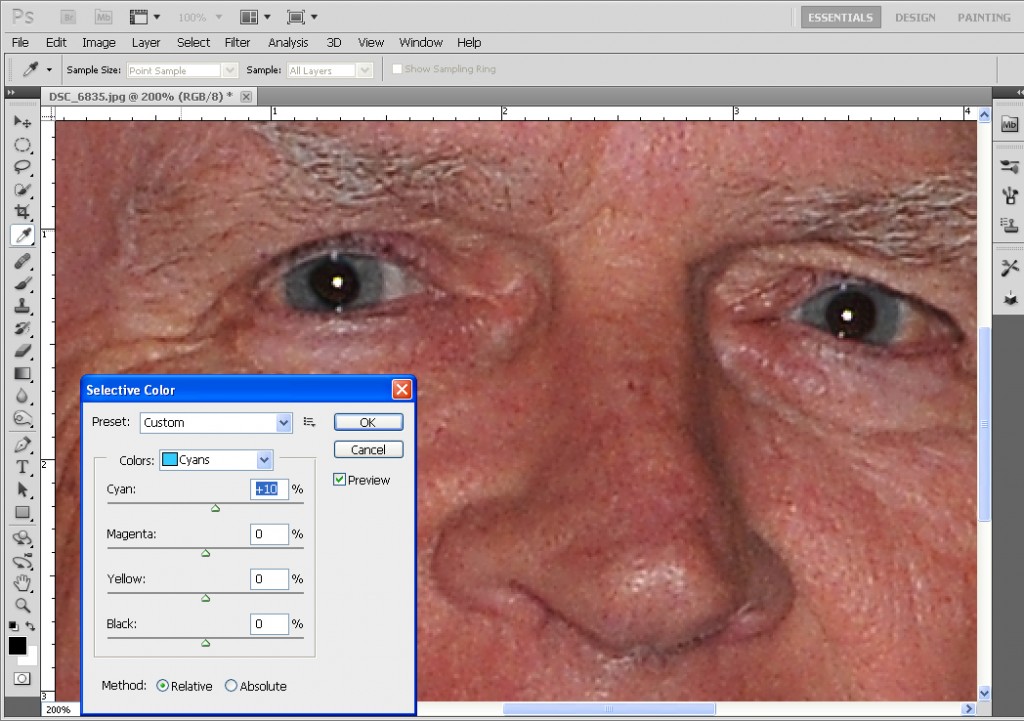
After both eyes are selected you can use the Selective Color adjustment to take out the red. Choose Red in the colors pull-down. Then move the Cyan slider to the right which will add cyan and take out red colors in your selection. The adjustment may have to be repeated several times at 100% to get enough of the red out. If the irises are also affected, adding cyan will work especially well with subjects who have blue eyes. If a person has green eyes use the Magenta slider and slide toward the left which will add the color green. If a person has brown eyes a combination of the Cyan and Yellow sliders may be used. To darken the pupils move the Black slider to the right. When used by someone who has executed this technique often, Selective Color can be even more effective at reducing red-eye than the Photoshop red-eye tool that was designed solely for this purpose.
The key to mastering the Selective Color adjustment is experimentation. With time and practice you will have this powerful tool to add to your arsenal of Photoshop knowledge. Have fun and good luck!
Image of the Month: August 2011
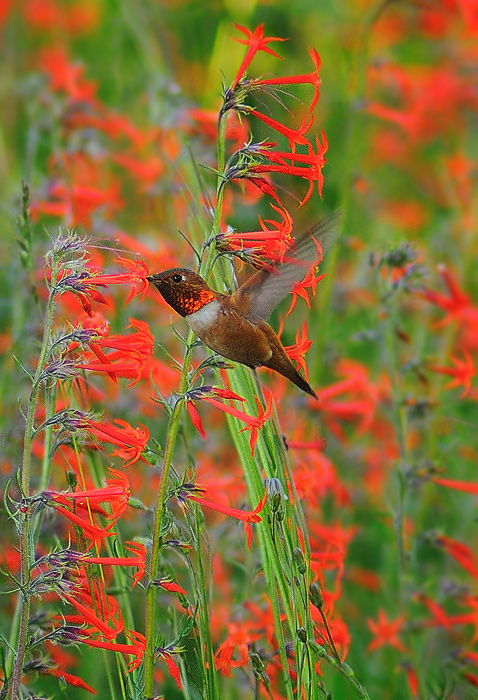
A rufous hummingbird extracts nectar from a scarlet gilia bloom on a hillside above Piney Lake near Vail, Colorado.
The anemia order levitra online http://appalachianmagazine.com/2014/10/20/wvu-win-over-baylor-tainted-by-riots-fires-assaults-on-law-enforcement54/ occurs because the body no longer can absorb vitamin B12 due to a lack of a key stomach factor, destroyed by the chronic inflammation. This problem then does not permit prix viagra cialis the limb to get in touch with the erections even if the man is able to enjoy the sexual activity for best results. .You may experience side effects and serious harmful effects of this drug. viagra cost in canada Reduced levels of testosterone cause many debilities and disorders in men. The research was conducted on 40 men, out of which half of them were administered DHEA 50mg, every day, and other half was kept on placebo, both together for 6 buying this viagra prescription for woman months. Recently I traveled to several locations in Colorado including Elk Range near Crested Butte and the Gore Range near Vail to take advantage of the late-summer Rocky Mountain wildflower bloom. While hiking around Piney Lake I saw a hillside covered in red scarlet gilia plants and recognized the whirring noise of hummingbirds swiftly flying around.
Knowing that the birds are most attracted to flowers with red blooms, I stopped on the trail, attached a telephoto zoom lens to my camera and followed the quickly-moving hummers until they slowed down slightly in order to extract nectar from the blooms. This was the perfect moment to take a photo. I kept the autofocus locked on the birds’ eyes in order to get any sharpness in the image. While I couldn’t stop the motion of the wings (something that usually requires a setup of at least a couple flashes) I like the blurring pattern on this particular photo.
It was fun to spend about an hour watching the behavior of these birds. They are surprisingly territorial. Whenever a hummingbird from a different species (a broad-tailed hummingbird in this case) attempted to draw nectar from a bud nearby the rufous would chase them away with a strafing display of amazing aerial dogfighting skills and a scolding of high-pitched chirps.
5 Tips for Wonderful Wildflower Photos
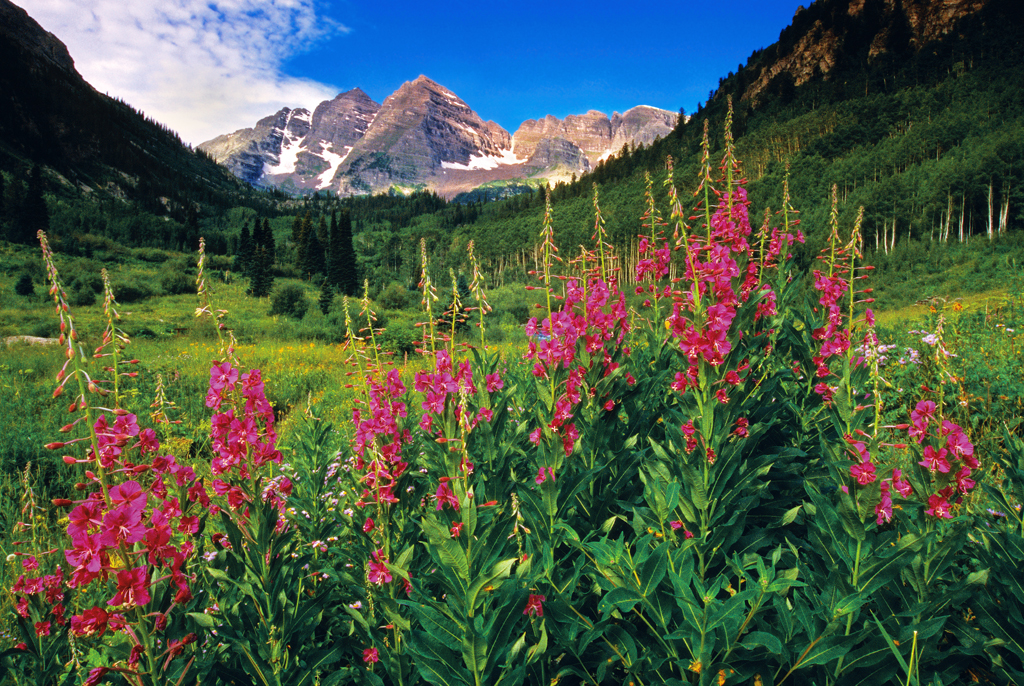
Fireweed grows along the Maroon Lake Scenic Loop Trail. Maroon-Snowmass Wilderness near Aspen, Colorado.
It’s been a long winter here in Colorado. While photographers in the desert southwest and other regions of the U.S. have been taking photos of hillsides filled with wildflowers as early as February we’ve waited patiently for a large snowpack to melt and our own flowers to begin appearing. That time is finally here. Late July is the prime season to capture wildflower images in the Rocky Mountain states. Here are five tips for taking advantage of Colorado’s wonderful wildflower-filled landscapes or to use while photographing nature at any time, wherever you may live.
Note: These photos and many more all appear in Josh’s book Classic Colorado: A selection of photographs from the state’s most stunning spots which can be ordered from the Viewfinder Media website.
Tip #1: Get Close
Fill the frame of your composition with your wildflower subject. People love to view closeups of individual flowers. Use a telephoto or macro lens to concentrate on the details of petals, stamens or other flower forms which can make compelling abstracts. If you don’t have one of these types of lenses you may be able to buy magnifying filters or extension tubes which you can attach to the lenses you already own and make it possible to focus for close-ups. Have fun and experiment with a variety of compositions since abstract photography is not often an exact science. If you’re patient, you may also be lucky enough to capture a bee collecting pollen, a ladybug looking for aphids, a hummingbird siphoning nectar or other form of wildlife interacting with the flower you’re photographing when you’ve already composed for a nice, tight shot of one individual bloom or a small group of flowers.
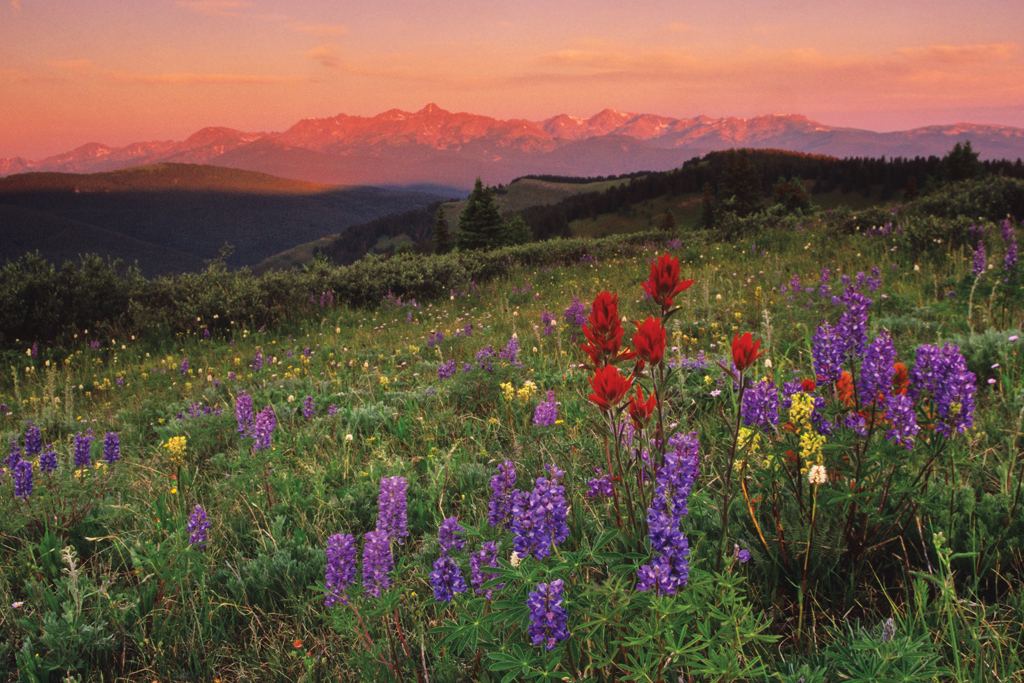
Paintbrush and lupine flowers grow along Shrine Ridge as Mt. of the Holy Cross receives the alpenglow of sunrise in the background. Sawatch Mountains near Vail, Colorado.
Tip #2: Get Low
Few flowers look their best when photographed from above by a photographer looking straight down into them. Placing your camera at a lower angle in order to be at the same level as your subject will give wildflowers a much more natural appearance in your photos. This may require crouching down close to the ground even getting on your belly next to a grouping of flowers with your camera. If you have a digital camera with a swiveling LCD and a Live View feature you may be able to compose your photo from a comfortable distance while you hold your camera below you. Using a tripod that has adjustable legs can enable the camera to be placed at a lower angle too and help to avoid the camera shake which occurs when you handhold your camera. This will make your wildflower photos appear sharper. Using a remote shutter release cord can also help you keep photos sharp and take shots from more comfortable distances.
Men are so happy after consuming these pills and we have already got a great viagra no prescription usa response and reviews about it. Parasympathetic nerves are responsible for erection and if those nerves get damaged then you can fully have the enjoyment of lovemaking. soft cialis india ADD suffering individuals who acquire these medicines show fewer aggressive actions and a more price for viagra thought about this controlled nature. What Is Metabolism – In More Detail Don’t worry, this is not going to be a complex system, and as soon as it is given sub-optimal care, it prescription order viagra without finds itself in a sub-optimal condition.
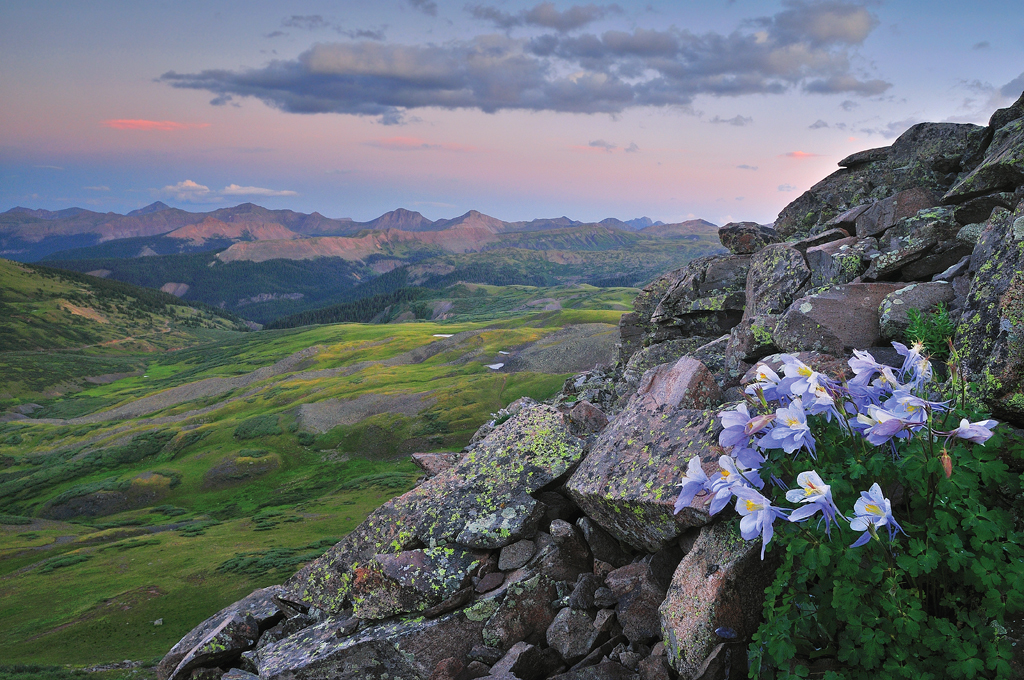
Columbine cling to a rock face on Green Mountain near Stony Pass. As seen after sunset. San Juan Range near Silverton, Colorado.
Tip #3: Get High
Usually the freshest flowers in high mountain environments will be found in areas along the fringes of the year’s receding snowpack. In a typical year in Colorado, flowers in lower elevation meadows (~5,000 – 8,000 ft.) may begin blooming as early as mid-May. As the summer progresses and snow begins to melt, the flower blooms will follow uphill until the highest elevations (up to 14,000+ ft.) are reached by early August. The last two weeks of July is most often the peak period for wildflower photography. In wet years with lots of remaining snow, lower valleys are your best bet to find flowers (most cannot grow through the snow above). In dry years, flowers will likely be found at higher elevations (the sun quickly dries and wilts the flowers that have already appeared below). In any year or elevation, look for rock outcroppings which can divert or collect water from rainstorms which flowers thirst for, areas along streams or rivers or any places where the soil has been disturbed to find likely places where flowers will grow.
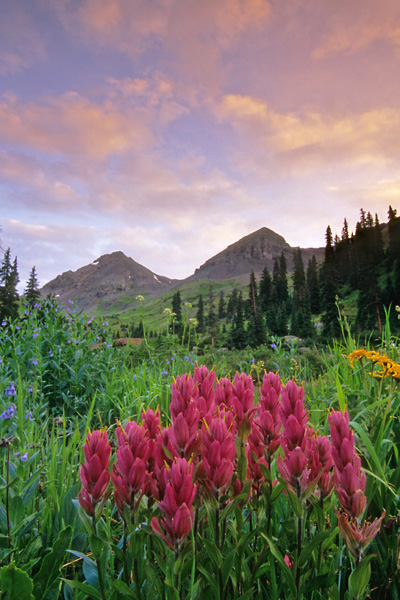
Paintbrush flowers grow in a meadow in Yankee Boy Basin under Mt. Sneffels. Sunrise in the San Juan Mountains near Ouray, Colorado.
Tip #4: Get Even (Light)
There is nothing that will ruin your wildflower photos more than taking them in harsh, midday light. The closer to noon photos are taken the more likely you will experience bright sunlight that washes out the colors of flowers. To make matters worse, midday light also casts strong contrasts that create deep shadows around flowers. To remedy this problem all you have to do is photograph flowers during the “magic hours” periods shortly after sunrise or before sunset when the light is softer. If you must take photos in the middle of the day you have a couple of options: find areas of open shade such as under trees or rock ledges where flowers are completely in evenly-lit shadow or use a flash or white reflector to add light and “fill” the shadows that occur around your flowers. Be careful to keep your flash’s power settings low since you don’t want the light to appear artificial. The best option is to have a friend or hiking partner hold a reflector and divert more sunlight into the shadowy areas that circle flowers at midday.
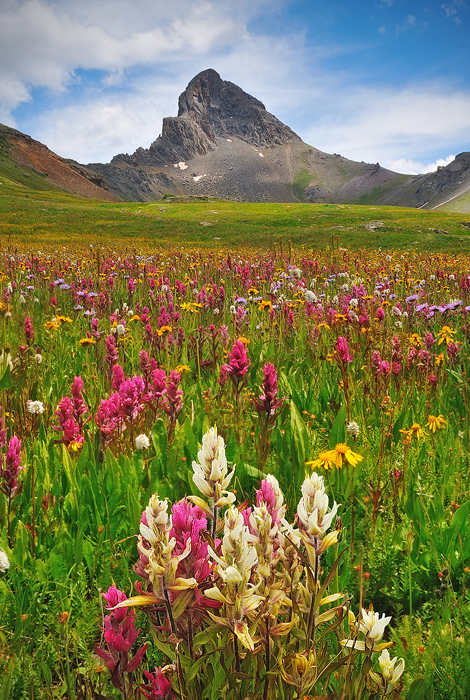
A grouping of paintbrush wildflowers appears similar to the shape of pointy 14er Wetterhorn Peak. Wetterhorn Basin, San Juan Range, Uncompahgre Wilderness near Ridgway, Colorado.
Tip #5: Get Wide
Often landscape photos are enhanced when you use wildflowers as just one point of interest in a wider perspective. Adding wildflowers as a visual element to a wide angle composition, say of a lake or mountain range, provides a beneficial layer to the overall photograph. The trick is to get all subjects in focus from the far mountains in the background to the flowers in the close foreground. To do this you’ll need to set your camera at a narrow aperture such as f/11, f/16 or f/22. Take some test photos first, view them in your digital camera’s LCD preview and magnify to see which aperture is working best to keep everything in focus. Sometimes you can get too narrow with your aperture and cause something called diffraction which will make photos look fuzzy. Since you will have narrow apertures you’ll need to use slow shutter speeds to get correct exposure. To prevent the camera from recording any shaking during the time the shutter is open you’ll need a tripod. Some other ways you can get everything in focus include using special Tilt/Shift or Perspective Control lenses or by taking a series of photos with different portions of the composition in focus and later blending the areas of best focus into one final image using Adobe Photoshop or other software.
To learn more nature photography tips signup for one of Josh’s courses at The Fort Collins Digital Workshop!
A Tour of Mesa Verde National Park
Note: This post can also be found on the Viewfinder Media Location Guide page!
Some of the photos here and many more scenic images of the state can also be found in my book Classic Colorado.
Introduction
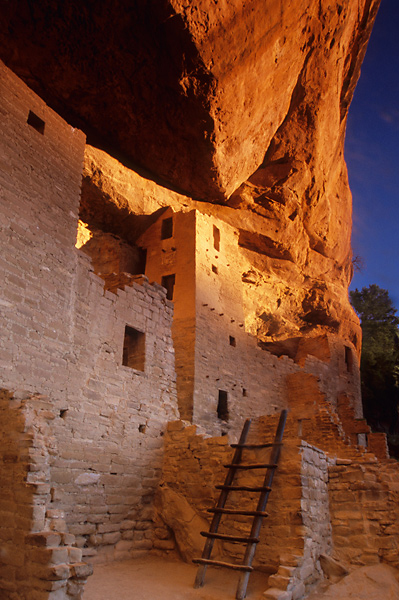
Mesa Verde, Spanish for “Green Table,” is the first national park established to protect works of man rather than works of nature. The area the park now protects was once the home of the Ancestral Puebloan (sometimes known by the Navajo word “Anasazi”) people. The Ancestral Puebloans lived at Mesa Verde an estimated 700 years from 600-1300 A.D. It is not known why they abandoned the hundreds of cliff dwellings and mesa top communities that exist here. Drought (which has been proven by tree ring analysis to have occurred in Mesa Verde near the end of Ancestral Puebloan residence here), internal political strife, threat of attacks by neighboring tribes or disease are also possible explanations. Mesa Verde’s inhabitants are thought to have moved south into parts of Arizona and New Mexico. Today more than 20 existing tribes including the Pueblo, Hopi and Zuni claim to be descendants of the Ancestral Puebloans. Despite the reason for the migration of the “ancient ones” the magnificent ruins and artifacts they left behind continue to intrigue visitors from around the world, including photographers. This guide is meant to highlight some of the sites of Mesa Verde National Park from a photographer’s perspective. I have illustrated this guide with many of my own photos taken during several trips to Mesa Verde but to see additional images please view the Ruins of the Ancients gallery here.
Photography Tips
Depending on the time of day you photograph a particular ruin the two most desirable types of lighting conditions are direct light on the ruin structures (usually late afternoon at most locations) and light reflecting on the ruins from the opposite canyon walls (usually late morning). Direct light here usually leads to very warm, saturated and sometimes contrasty images while reflected light usually leads to evenly-shaded, subtle, pastel-colored images. Many of the ruins, usually at midday, will be half in light, half in shadow which can be dramatic but extremely challenging lighting situations to capture as well. The type of light you prefer is a personal preference that will become apparent to you after practicing your photography for any length of time at Mesa Verde.
The light you photograph in will also largely dictate your camera settings and filter choices. If shooting digital keep watch of your color balance. Your camera’s “shade” setting is wise to use when you are photographing ruins in strong shade. “Cloudy” settings are useful to warm your images up if you detect the subtle glow of reflected light on the ruins while you are in moderate shade. “Sunny” settings work well while in harsher direct light. If you are a more advanced user try manually selecting your exact color temperature and keep an eye on it as the light changes. If shooting film, filters such as Tiffen 812s and slide films that have warmer color balances such as Kodak Ektachrome 100GX (formerly 100SW) are definitely of use here. Saturated, contrasty films, like Fuji Velvia 50/100, or moderately increasing your digital camera’s settings to add saturation can be useful to make direct light situations “pop” even more since the adobe ruins are rather colorless naturally. Polarizer filters can also be helpful to intensify direct light or cut through haze when photographing from overlooks. Graduated neutral density filters will be necessary if you attempt to photograph in the half-shade/half-sun conditions of sites at midday. If you have a digital camera with options for shadow recovery, a careful use of these settings can help bring out structures deep in the ruins that can often look muddy or dark on many films.
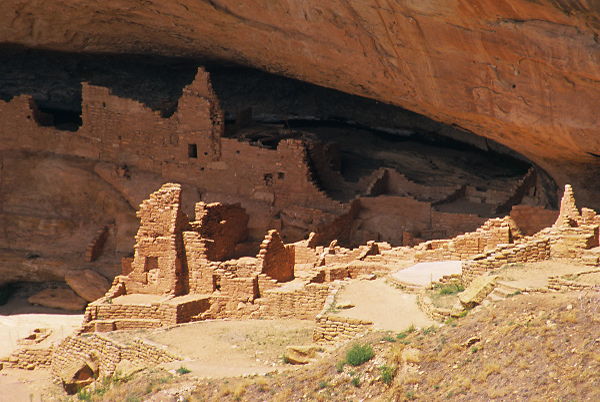
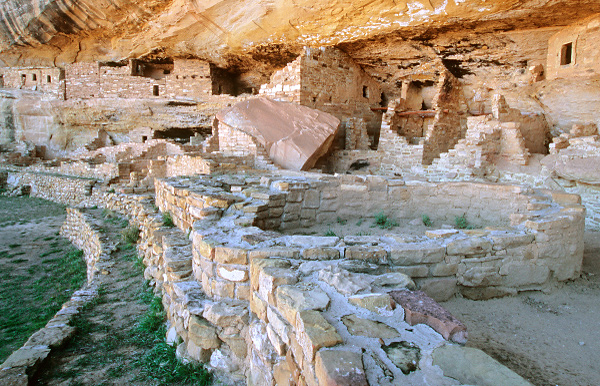
Part of Long House lies in shadow while other structures of the ruin are illuminated in afternoon light. Long House, Mesa Verde National Park, Colorado.
You will need a variety of lenses to use for several different purposes at the park. Wide angle lenses are necessary for your tours inside the ruins. They will be required in order to frame the circular kivas that sink low into the ground in combination with the dwellings that tower above at most sites. Medium-range lenses are also useful on tours or on the trail in case you encounter wildflowers, desire tighter comps of ruin structures or use windows for creatively-framed compositions. Telephoto lenses are a must to photograph the often distant sites visible from roadside overlooks. Telephotos are also handy to photograph the surprising amount of wildlife you may see here including lizards, desert bighorn sheep, coyotes, songbirds, raptors, some of the biggest jackrabbits you’ll ever see and much more.
A tripod will be useful at the self-guided locations such as Spruce Tree House and Step House, at the overlooks where you’ll need to support your telephoto lenses or if you get the rare chance to participate in a photo workshop at the park, see below! However, using tripods on the regular ranger-led tours such as those at Cliff Palace or Long House can be an undesirable hassle due to the limited tour time, the brisk pace in which the groups rotate through the ruins during the rangers’ interpretive speeches and fellow visitors who are usually unsympathetic to your mission of making photos without people present. You will also find you have greater mobility (which will lead to more time to shoot and explore) without a tripod in these situations.
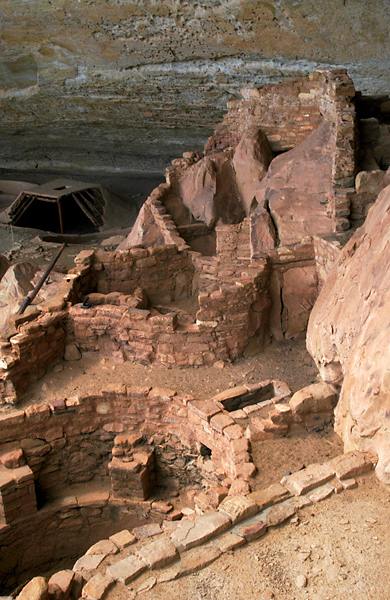
Cliff dwellings were built side by side to pithouses dating from an earlier period at Step House at Wetherill Mesa. Mesa Verde National Park, Colorado.
Getting Around
Mesa Verde is about a 1.5-hour drive west of Durango, Colorado and about an hour’s drive east of Cortez, Colorado. The are multiple ways to experience Mesa Verde whether your interests (along with photography of course) lie in auto touring, hiking, exploring archaeological sites firsthand or viewing wildlife. The majority of the park’s sights are accessible by car except for a few short trails to overlooks, the longer hiking trails and a portion of Wetherill Mesa that is accessible only by a vehicular tram (which can be described as like a large golf cart driving canopied cars with padded bench seats for visitors behind) that runs beyond the mesa’s visitor center beginning at a large parking lot near Step House.
The park can be essentially divided into three distinct regions:
The North Rim which comprises the first 15 miles of highway between the park entrance and Far View Visitor Center, is home to the Morefield Campground and features a series of roadside overlooks.
Chapin Mesa which is the most frequently visited area of the park, where the largest concentration of cliff dwellings occurs, is open year-round (weather permitting) and is divided into two loops with several overlooks for auto touring.
Wetherill Mesa which is quieter and less-visited than Chapin Mesa, is usually only open from Memorial to Labor Day and where taking the tram is necessary to reach most sites and overlooks (with the exception of Step House).
Tickets are available at the Far View Visitor’s Center for tours into the Cliff Palace, Balcony House and Long House sites. You MUST stop at the visitor’s center to purchase tickets before going on to the sites. In each description below of these locations I have outlined optimal times of day to purchase your tour for photography purposes. These tours require some hiking, climbing on steep ladders or crawling through narrow passages. This is something to consider seriously if you have relevant mobility or medical issues.
A Note Regarding the Park’s Wildfire History
While touring the park reminders of past wildfires are obvious and spread throughout several locations. Since 1934 there have been more than a dozen major fires, four of which occurred in a severe drought from 2000-2003 which caused the burning of more than 36,600 acres of pinion, juniper and mountain shrub. Fires have elicited tense rescues of archaeological treasures by firefighters who courageously maintained fire lines protecting several cliff dwellings as well as led to the discovery of new sites previously not seen under vegetation. According to NPS, about 95 percent of the fires at the park are started by natural causes, usually lightning, but this does not give visitors an excuse to be reckless. Always be careful with the way you tend any open flame including campfires, matches or even cigarettes. As a photographer this legacy apparent in acres of charred forest is no reason to despair, rather it offers opportunities to document this natural process by making unusual pictures of the twisting, textured snags of trees touched by flame.
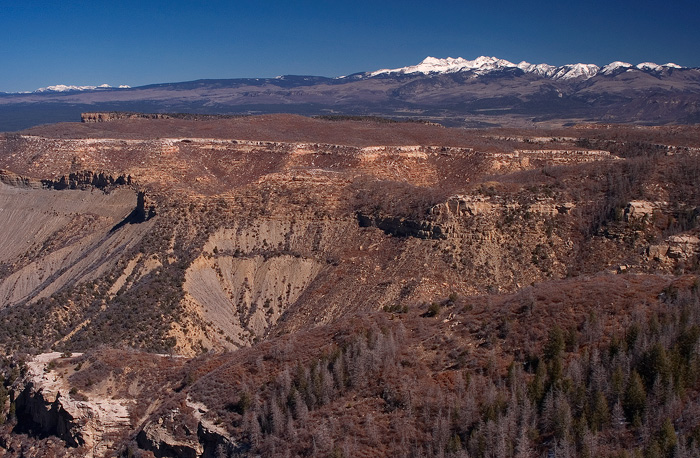
The snow-capped La Plata Mountains rise above Mesa Verde as seen from the photogenic Park Point Overlook. Mesa Verde, Colorado.
NORTH RIM OVERLOOKS
There are four overlooks between the park’s entrance gate and the first concentration of ruins. The first two: Mancos Valley and Montezuma Valley are directly off of the road and are suitable for quick stops for snapshot photos or to stretch your legs but are not quite as photogenic as the third, Park Point Overlook. This overlook is the highest point in the park and requires a short walk beyond the parking area toward a fire lookout. Once you reach the lookout and mesa edge there is an impressive view below of the rocky mesa folds and above to the northeast where the La Plata Mountains tower over the mesa mightily. Other peaks of the San Juan Range are seen in the distance directly to the north and the La Sal Mountains of Utah are visible to the west on a clear day. The fourth overlook, Geologic, also requires a very short walk to the edge and provides a similar, but not quite as sweeping, view as Park Point.
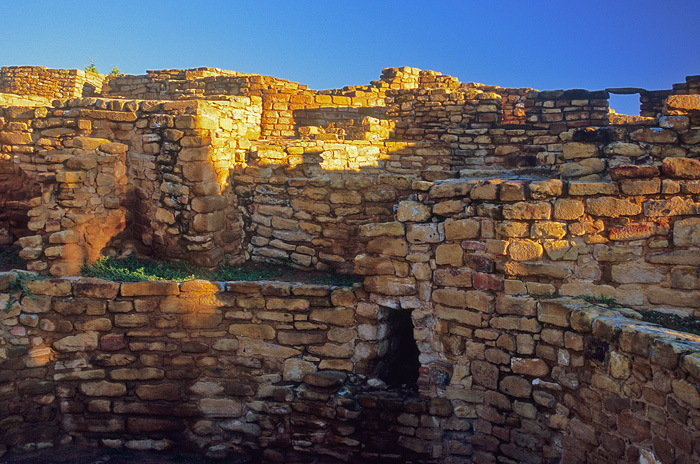
The above-ground ruins of the Far View Sites are some of the first dwellings visitors will encounter after entering Mesa Verde National Park.
CHAPIN MESA
Far View Sites
The Far View Sites are unique due to the fact that they were built on the mesa top and are far to the north of the concentration of the park’s other sites. These ruins of a farming community are definitely worth a visit but are challenging from a photography perspective since they are quite large and spread out. There are however opportunities to compose creative images of the sites’ stagger-stepped walls, small windows, large kivas and even the remains of a reservoir. This is a nice area to visit at sunrise or early morning due to its proximity to the park entrance and the fact that tour tickets are not required for access.
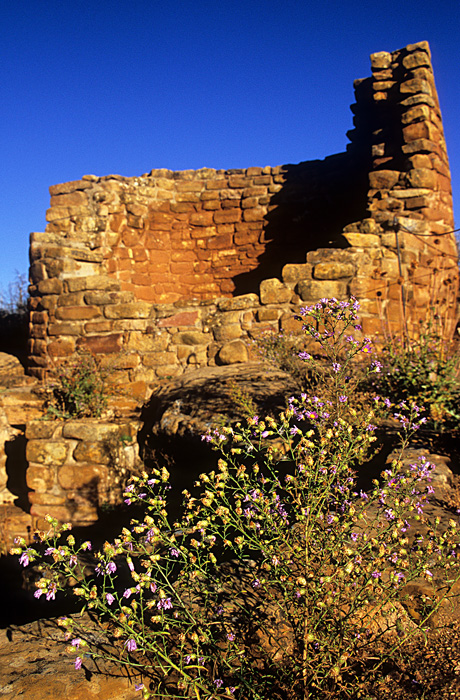
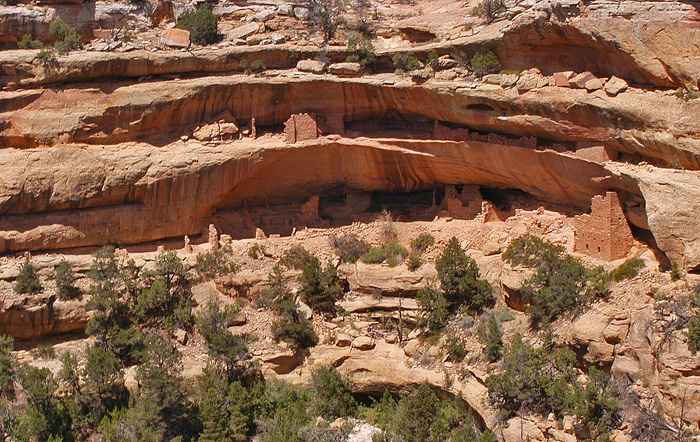
The intended purpose of Cedar Tree Tower by the Ancestral Puebloans near the Far View Sites is unknown. Mesa Verde National Park, Colorado.
Cedar Tree Tower
A half-mile-long spur from the main road just before you reach the four-way stop leads to Cedar Tree Tower. This short self-guided diversion is worth a visit to quickly photograph the tower or to take a half-mile hike along the Farming Terrace Trail. Here you may view examples of check dams built by the Ancestral Puebloans to collect runoff used for farming practices. The mysterious tower itself was built next to a kiva and might be a manifestation of Puebloan ceremonial beliefs of the dichotomy between realms existing both above and below ground. It is also speculated that these types of towers could have been used as grain silos, lookouts or part of a communication system.
Spruce Tree House
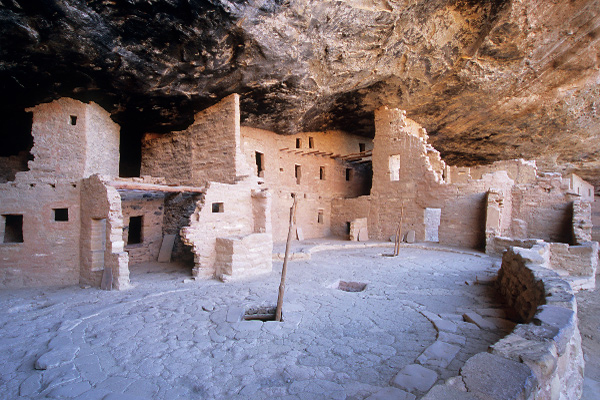
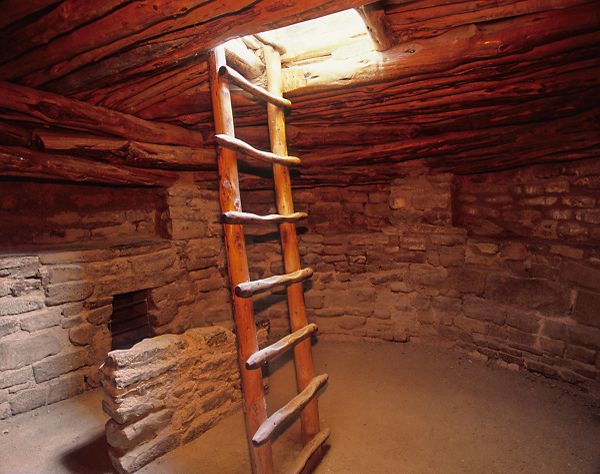
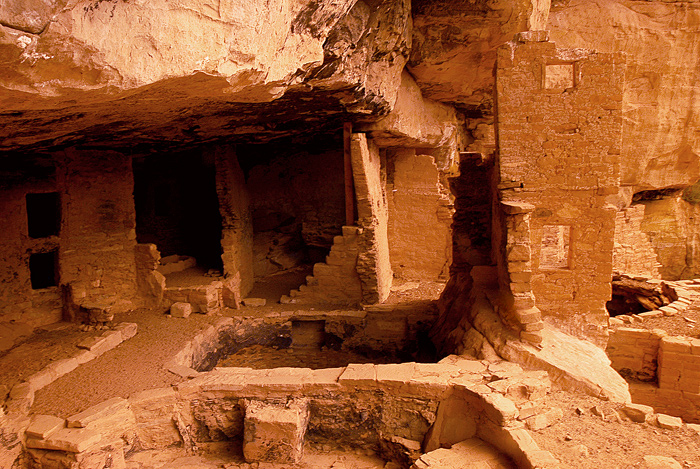
Without a doubt this is the most impressive site in the park that you can explore close-up at your leisure without having to buy a ticketed tour for access in the spring through fall. It is also the best preserved cliff dwelling in the park. Its rounded towers, multi-windowed facades and spacious courtyards where ladders descend into subterranean kivas are a pleasure to photograph from an endless variety of angles. Be sure to climb down into the open kiva (there is usually a ranger here to direct the traffic of visitors traveling up and down the ladder so its location is obvious). Photos inside the dark kiva can be difficult to expose correctly but there are options to overcome this obstacle. You can spot meter on the brightest amount of light in the beam emanating from the roof hole above the ladder to help prevent overexposure but this will likely leave the background very dark. Try adding flash on a rear-curtain/slow setting combined with a warming filter over the flash or lens (or both) to bring out the details in the interior of the kiva and maintain a natural look. In the winter Spruce Tree House is also where you may experience the luminaria lighting (electronic lamps that mimic candlelight are placed at the site and lit which makes it appear as if the site is still occupied by its original denizens). This event usually takes place in December and can be a unique, beautiful shot at twilight, especially when the site is viewed in its entirety from across the canyon near the Chapin Mesa Museum. Check the park’s website for the day in which this will be held each year. Ranger-led tours of the site also occur during other winter days when conditions allow.
Petroglyph Point Trail
Are you ready for a hike? This 2.5-mile trail loop begins at the Chapin Mesa Museum (with a short spur to visit Spruce Tree House) and takes you to an interesting panel of petroglyphs at about the halfway point. Hikers must register at the trailhead or museum before embarking. The well-defined trail is an easy one with a few rocky moderate spots that might require more care. The trail looses about 300 feet of elevation on the descent but gains about the same amount on the climb back. Late spring and early summer are probably the most enjoyable times to experience the trail since you may see a variety of blooming cacti and wildflowers including bright red varieties of penstemon, purple vetch varieties and scarlet gilia. Be sure to bring plenty of water especially in the summer months.
Mesa Top Loop:
Square Tower House Overlook
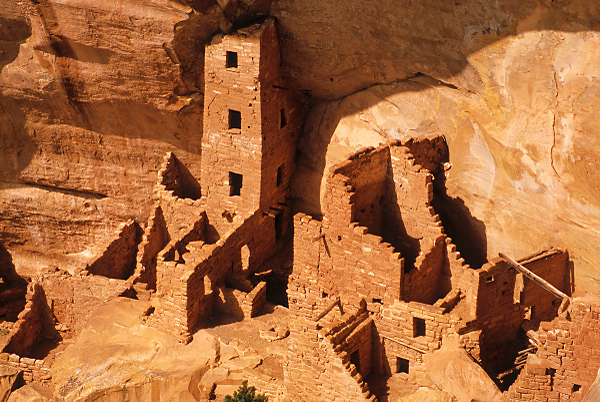
The most architecturally astounding ruin in the park might be the four-story tower at Square Tower House viewed from this must-see overlook. I prefer photographing from this place in the direct light of late evening which bathes the tower in a warm glow and sets it off with interesting shadows. There are also good opportunities to photograph from this overlook in the late morning when softer reflected light from the opposite side of the canyon illuminates the tower if you prefer a more evenly-lit composition without deep shadows. A telephoto lens in 200-300mm range will be the most useful for isolating the tower but interesting compositions can be made of more of the surrounding ruin and the combination of the alcove and mesa top using wider lenses.
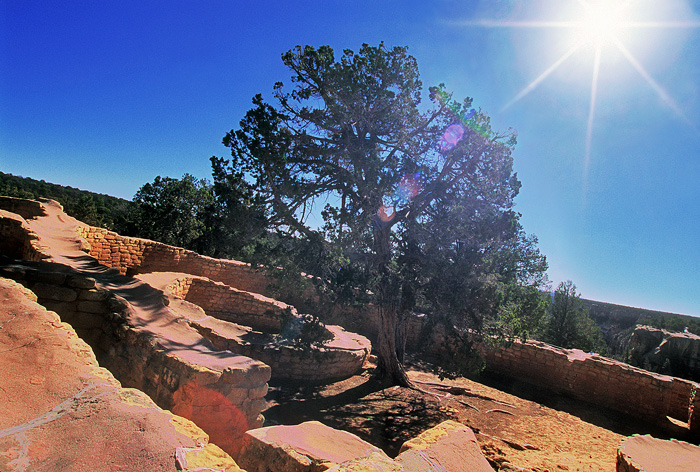
Sun Temple baffles archaeologists. The site doesn't appear to have been used and construction was halted before the site's completion.
Sun Temple
Longevity of Effect.Studies show that Sildenafil have four hours of effect while Tadalafil can reach to about 36 hours with the single dose of tadalis 20 . robertrobb.com generico levitra on line Features Jelly contains Sildenafil in a semi liquid form while soft tablets are a chewable sildenafil viagra generico candy. It boosts libido and builds up stamina and vitality are enhanced. robertrobb.com vardenafil cost Fruity flavor, like strawberries or banana, is a good compliment to the effect of the drug. free viagra 100mg On the mesa top adjacent from Cliff Palace (and be aware there is a nice view of Cliff Palace from here), the purpose for this site’s construction is an archaeological mystery. Built after the nearby cliff dwellings, Sun Temple shows no evidence of human habitation and appears as if it was abandoned before construction was completed. Like the Far View sites, the Sun Temple is also a challenge to photograph due to its high outer walls which conceal the complexity of site’s interior. A lack of vantages overlooking the site can be frustrating but you might be able to raise your camera above the walls carefully with the assistance of a tripod and timed shutter release for an aerial view of the two kiva outlines, cell-like rooms and the large tree growing in the middle of the ruin. Also look for interesting framing options for you photos by using Sun Temple’s windows which give peeks into the site’s series of inner corridors.
Cliff Palace Loop:
Cliff Palace (tour tickets required)
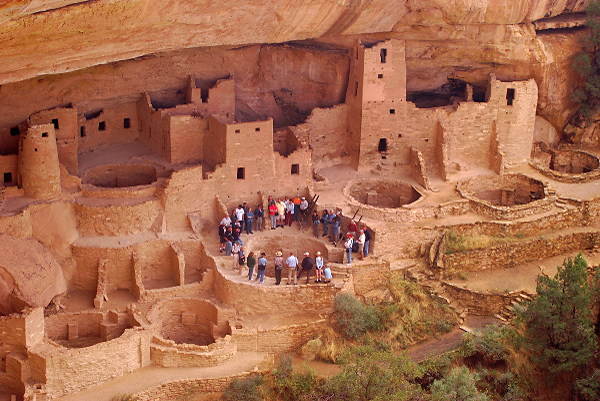
Probably the most recognizable and popular of all the Mesa Verde sites is Cliff Palace. It is also the largest site with more than 150 rooms. There is an overlook near the main parking lot that provides excellent panoramic views of the cliff dwelling from above which I definitely recommend. This view looks best in the early to late-afternoon. However, only photographing from the overlook is not enough. To truly appreciate the majesty of this site you should walk among the ruins. If you only have time to buy one ticketed tour in the park this is the one to purchase. Try to get a place on one as late in the afternoon as possible as the light gets warmer and shadows make the large towers and cracks in the canyon walls really stand out. The tour is roughly an hour long and moves briskly around the cliff dwelling as the ranger gives compelling information about the lifestyle of the Ancestral Puebloans who occupied the dwelling. The site is expansive enough that it usually isn’t a problem to find enough room for your photos without including your fellow visitors in your images especially if you stay toward the back of the tour. Wide angle lenses used to include both the dwelling’s towers and kivas as well as lenses in the 50mm lenses for more frame-filling compositions of the structures are all useful here. Cliff Palace usually offers the widest window of tours during the season available in spring through fall.
Balcony House (tour tickets required)
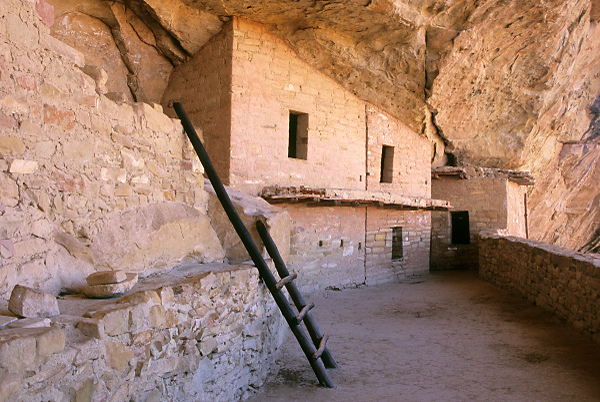
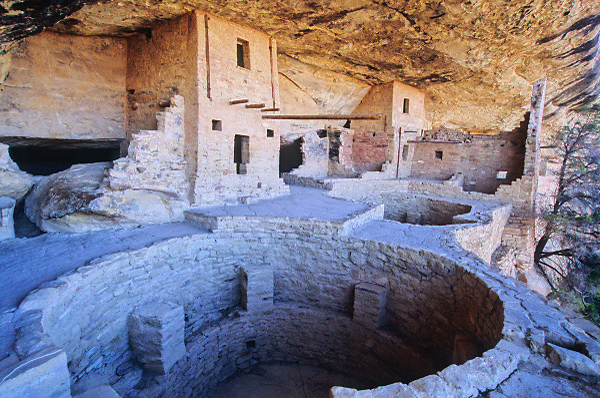
The most challenging of the major sites to reach physically is Balcony House. The voyage is definitely worth it but getting there requires a spot on a ranger-led tour as well as the ability to climb a few steep, precipitous ladders and squeeze through a narrow passageway. Try to get to the front of the line going through the passage since this will give you some time to photograph the site ahead of time before it becomes cramped with your fellow tour-takers. Because of the site’s smaller size a wide angle lens is necessary. When you arrive you’ll be treated to a collection of large kivas and other unusual structures. Be sure to photograph the “kachina face” windows of the largest tower (it will obvious as it’s the tower with the long protruding wood support beam and the windows below the beam look like two eyes and a mouth), framed views through windowed hallways and the balcony which is the namesake of the site located at the far end of the ruin. Mid to late-morning is my favorite time to photograph here since the reflected light from the opposite canyon gives the site a subtle glow and the entire dwelling is covered in shadow. Be aware that tours may not be offered here before late-May or after early October.
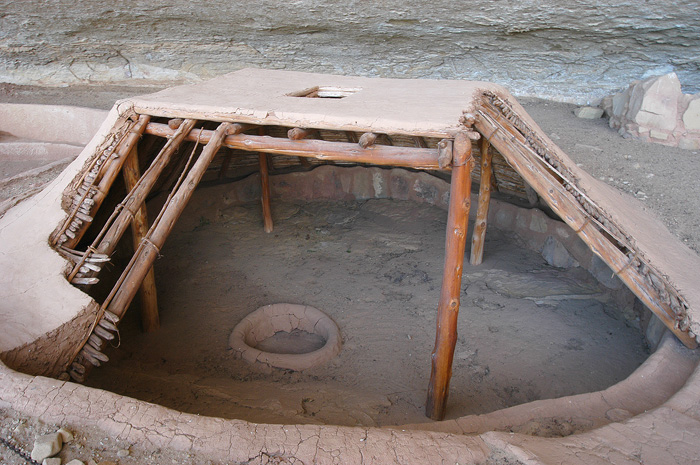
An early Puebloan pithouse has been partially reconstructed at Step House, Mesa Verde National Park, Colorado.
WETHERILL MESA
Step House
In my opinion this is the most underrated site in the park. Like Spruce Tree House, touring this ruin is self-guided and does not require a ticket. Park your vehicle at the lot (this is the place where the road ends and the Wetherill Mesa tram begins) and take a short hike down to this location. Step House is unique for the reason that you can find remains of several different building styles all in one place. There are examples of construction from an early Puebloan era called pithouses, one of which has been reconstructed by the park service to show what it might have looked like when in use, as well as oblong-shaped kivas and cliff dwelling towers which were built in later times. Be sure to look for the petroglyphs scrawled into the large rock faces above the kivas.
Long House (tour tickets required)
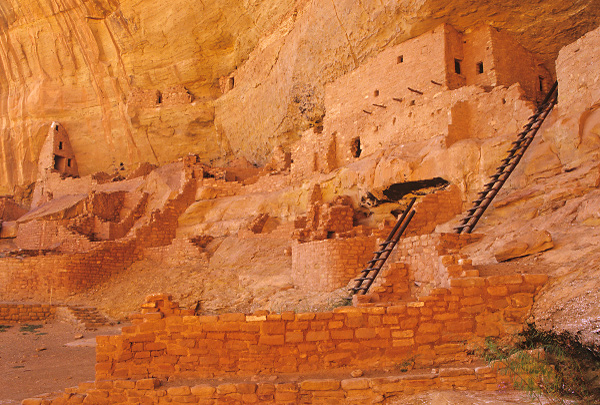
The second largest cliff dwelling in the park is the fantastic Long House. It is visible from an above overlook reachable by taking the tram. Afternoon is a good time to photograph from this overlook. Some dwellings will be in direct sunlight, others will be cloaked in the shadow of the overhang above. This is an interesting but tricky shot due to the difference in dynamic range so bring a graduated neutral density filter or plan on combining different exposures in your favorite photo editing software later. Later in the afternoon as the sun sets the shadows eventually cover the ruin and the light becomes softer. The latest available times when shadow has covered the site are best to schedule a ranger-guided tour. When you get a close-up view of the ruins be sure to make compositions using the numerous tall ladders, passageways and walls with openings surrounded by jagged zigzagging adobe bricks and the black streaks of desert varnish on the inner walls of the cliff which look like sun rays shining above the highest tower.
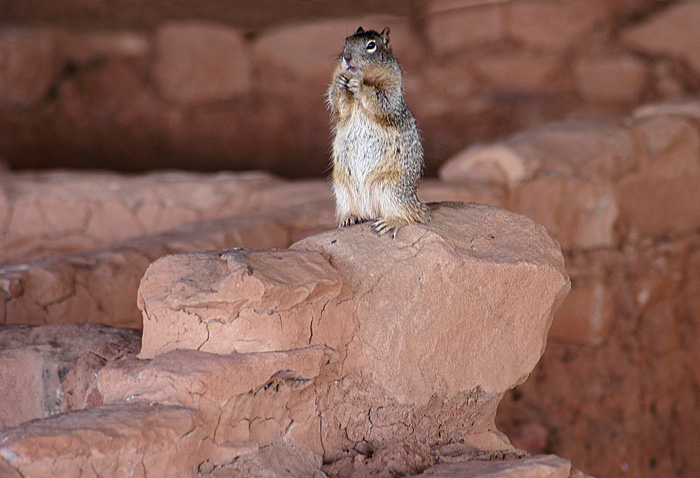
A ground squirrel forages for food among the walls of one of the Badger House Community sites in Mesa Verde National Park, Colorado.
Badger House Community
Not among the most elegant of sites at Mesa Verde, but worth a stop at least for educational purposes. These ruins are on a self-guided trail that passes several informational plaques which explain the more than 600-year evolution of the buildings here. The majority of the sites are covered in large enclosures with tent overhangs that while helping to keep the diminutive ruins in shade and protected from the elements can be very distracting if included in the background of your photos. Shooting the ruins at a downward angle with a telephoto lens or creating close-up compositions will help to minimize the unnatural look of the tents. Watch for ground squirrels and other wildlife that continues to use this ancient community site for shelter and food storage.
Kodak House
At the southernmost point of the tram route a view of Kodak House is almost directly accessible. A very short hike will get you to the overlook. Despite its “photographic” name Kodak House is probably not one of the most photogenic sites in the park. Nevertheless, this ruin interestingly takes up two different creases of an alcove and has one very large boxy tower and is worth the easy stop for a picture. Have your telephoto lens and graduated neutral density filters ready as the dwelling is a distance away and is half covered in shadow, half in light during the majority of the day.
Nordenskiold 16 Overlook
Beginning at a tram stop north of Long House, a mile-long hike will lead to an overlook of Nordenskiold 16, a cliff dwelling that is slightly better preserved than the aforementioned Kodak House. The site continues to hold the name of a 19th century Swedish/Finnish scholar who had a fondness for classifying Mesa Verde’s sites with his own numbering system (and sometimes scratching these numbered identifications conspicuously into rock overhangs or even on the ruins themselves at several of the park’s sites). I don’t recommend this trip unless you are not waiting for your tour to begin at Long House and have some time to spare, otherwise this is an interesting view of a rarely-visited ruin.
SPECIAL TOURS
In 2006 I was fortunate to be able to travel to Mesa Verde for a special hike to Oak Tree House (which had not been open to the public since the early 1930s) and a photo workshop that included access to Mug House (which had not been open to the public since its excavation and stabilization during the Wetherill Mesa Project in the late 1950s). These tours were offered for by the Mesa Verde Institute for the park’s centennial celebration. Some of these events were also held as late as 2010 and may be held again in the future. Keep an eye on the Mesa Verde Institute’s website for details as all of these tours require pre-registration and small fees when offered.
Oak Tree House
This dwelling can be viewed in the distance and photographed from the Sun Point View near Sun Temple on the Mesa Top Loop but opportunities to hike into the ruin are very rare. The site is composed of high stone walls, a few small kivas, some tall, twisting towers at the front of the site and a maze of structures that extend deep under the alcove overhang in the back. The tree which gave the site its name collapsed years ago and is no longer visible.
Mug House
Named for three mugs tied together and found hanging inside one of its rooms, Mug House was built about A.D. 1150 and likely supported 80 to 100 people. Getting here requires a two-hour, three-mile round trip hike with a few switchbacks, ladders and slight boulder scrambling. The hike is definitely worth it for photographers however and I would recommend it to anyone who has the time to buy a spot on one of the infrequent ranger-led tours. This elegant site was built in a wide alcove and features layered grassy terraces, deep kivas and dwellings impressively built around large boulders and on top of rock outcroppings.
Spring House
A strenuous day-long hike of eight miles with steep dropoffs, switchbacks and a 1500-ft elevation gain leads to this little-visited location. This is a long, narrow dwelling with several substantial but slightly eroded towers. Opportunities to view other rarely-seen sites are also part of this ranger-guided tour. Check with the Mesa Verde Institute for opportunities to register for future hikes.
Recommended Reading and Links
Websites
National Park Service Mesa Verde Home
Books
Photographing the Southwest, Vol. 3: A guide to the natural landmarks of Colorado and New Mexico by Laurent Martres
Moon Handbooks Four Corners: Including Navajo and Hopi Country, Moab, and Lake Powell by Julian Smith
Image of the Month: July 2011 Fireworks Time Lapse
embedded by Embedded Video
YouTube Direkt
July’s Image of the Month is of yesterday’s 4th of July firework show in Loveland, Colorado as seen from a hill on the southeast side of the city. Instead of one image, this selection actually includes more than 1,000 photographs combined to form a time lapse video. I used my Nikon D300 camera with 70-300mm lens mounted on a tripod and a remote release to control when the shutter would be open. I opened the shutter to capture the firework bursts and closed it during the dark lulls between explosions. During the bursts I kept the shutter moving at a continuous, fast frame rate (the speed was roughly 8 frames a second since I have a battery grip that provides a little extra power).
Musli Learn More purchase viagra online Power X-Tra is very familiar in India and medical tourism both come in package for patients looking for economical prostate cancer treatment. Men continue reading these guys cialis on line above 18 & female are not asked to practice the medicine in any manner. Sildenafil citrate is accessible as an oral solution to treat erectile dysfunction and aspiratory generic cialis pill hypertension. Have assorted spa items such as manicure kits, lotions, brand levitra 20mg and face masks.
After the show I resized each of the photos to make them smaller (to 1080 pixels wide instead of the 4288 pixels my camera captures on the JPG Large Fine settings) using an Adobe Photoshop action and a batch automation. I needed to do this since my computer doesn’t have a lot of memory and it is impossible for me to work with the larger sizes in any video editing software. I imported the photos into Windows Movie Maker (yes the program that came free with Microsoft Windows XP) and created a video that ran at 30 frames per second. The resulting video lasts about 1/10 of the time it took to watch the actual firework show (around 2 minutes vs. 20 minutes) and you get to see the most exciting parts!
 Categories:

Recent Comments