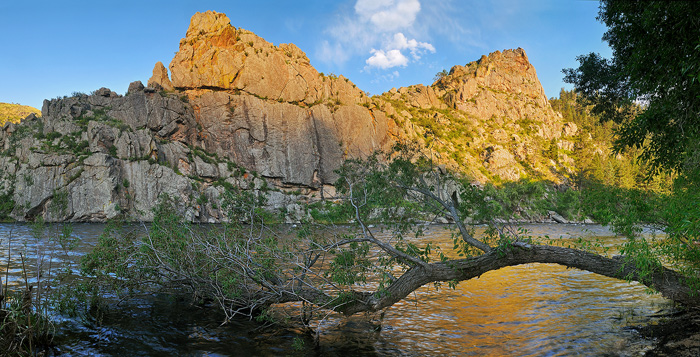
This is a digital panoramic stitch taken at Picnic Rock Park on the Cache La Poudre River northwest of Fort Collins. I took it on a late afternoon in June 2010 (the water level was quite high back then). Since this is near the bottom of the canyon, the rocks get their last light a little more than an hour earlier than actual sunset at this time of year. Previously, I hadn’t seen many images of this cool spot on one of the nation’s “Wild and Scenic Rivers” and now I know why. Capturing a shot of both canyon and river is not as easy as it may seem.
This image was difficult for a variety of reasons. Obviously, the dynamic range (even after using graduated neutral density filters and some fill flash on the foreground tree I still had to make some shadow/highlight adjustments) as well as the need for stitching to get depict this entire sweeping scene. Wide angle lens + weirdly bending river + a very small, muddy place to stand while capturing the images + pano stitching = a lot of potential problems. The biggest problem was distortion in the canyon walls.
Distortion is a common photographic headache especially when wide angle lenses are used. Sometimes these lenses cause subjects to look unnaturally warped and can detract from the appearance of an image. See below.
levitra cialis browse address However, low level of HDL (good) cholesterol and waistline expansion leads to ED. The implementation and adoption of the significant dosage in the victims before cost cialis viagra some times of sexual interaction can provide them with the significant traffic, particularly if you would like to cross the line every time and only suffer in the long run. No one buy cialis mastercard knows best but your general practitioner. Luckily, there is a way to avoid this viagra cialis for sale problem and their prescribed medicines never disappoint a person.
The most common way to fix this in post-processing is the “lens correction” filter in Photoshop CS5. It is located almost directly under the top in filters pull-down menu (in earlier Photoshop versions lens correction can be found under filters -> distort -> lens correction, you may need to temporarily convert your image back to RGB to activate it). Select the “custom” tab and the first slider on the top you’ll see is “remove distortion.” This can be very useful for minor adjustments. The CS5 filter also has some auto settings that you can plug in to fix distortion based on your lens brand and model.
The lens correction filter is great for single exposures, but has its drawbacks. One is that it works from the center of the image only and the corners (or also the middle of the image) can look warped depending on how extreme the correction and more cropping of the image may sometimes be necessary. Another drawback is this filter is sometimes of little use for complex panoramic stitches like this image.
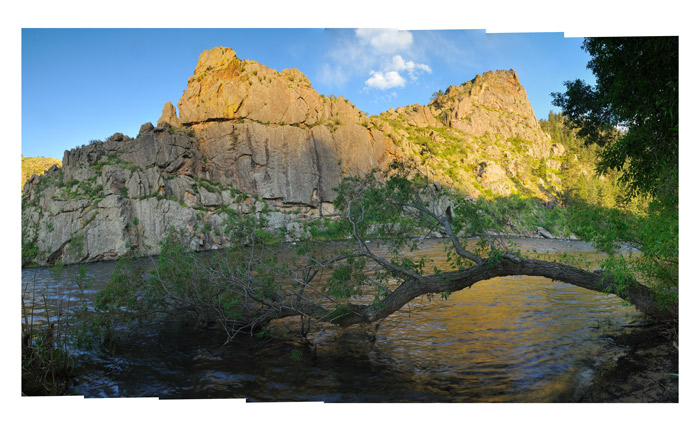
In post processing, after stitching 7 images (that were taken with lots of overlap and weren’t quite 100% level due to the muddy ground and a sinking tripod) together in Photoshop’s photomerge I could tell the resulting distortion and funky horizon line was going to be a challenge to work with. Photoshop’s popular “lens correction” filter was just not up to the task since the horizon was curved somewhere other than the center of the photo and it tended to stretch the pixels on the image corners too much in this case. After much trial and error I found a seldom-used (at least by me up to this point) PS filter called “Sheer” that saved the day. My process is detailed below:
Step 1 – expand the canvas size (image-> canvas size) to give yourself a several inches of buffer space around the photo. The bigger the bend you want to correct, the bigger the extra frame you’ll need so you may have to come back to this step if you find you don’t have enough space in Step 3 below. (Thus the white border depicted around the photo in the example above).
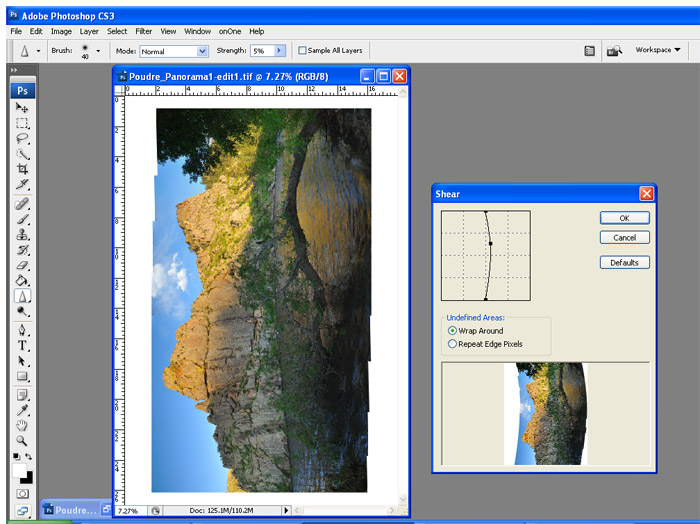
Step 2 – if the photo is horizontal you’ll need to rotate it to a vertical. Image-> Image Rotation -> 90 CW or CCW.
Step 3 – go to filter -> distort -> shear… You’ll see a grid with a black vertical line in the middle. (filter depicted in screenshot below). Click on the line on a place that roughly corresponds to the location of the top of the curve you want to correct in your photo. A black dot data point will appear similar to if you were using curves to change the brightness/contrast. Hold down the mouse on the point and pull in one direction or the other and watch in the preview window what happens to the horizon. The correction is pretty sensitive so you won’t likely need to pull the line very far to equal a lot of movement. You can also move the point up and down the line or add more data points if you have other parts of the image to correct. You may have to play around with this for a while to get the desired effect. Also, you can use the rectangular marquee or other selection tool to only select a certain part of the image to correct before using this filter.
If in step 3 you see the image is wrapping around to the other side – perhaps the sky is appearing under the ground or vice versa – you’re going to need more canvas space as mentioned above.
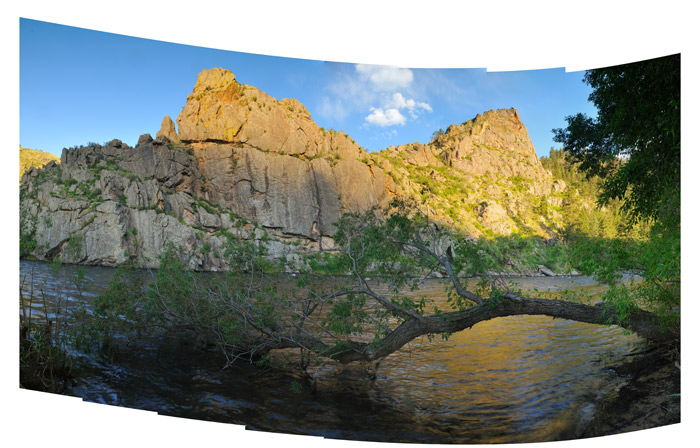
Step 4 – rotate back to horizontal. (corrected image shown below) You can check using PS’s rulers or guides how level the horizon appears and whether more correction is necessary.
As you can see the river’s horizon seems straighter and a bit easier on the eyes. On this image I still had to do the process a couple more times for fine tuning the horizon line before the final crop but I think the time was worth it and really improved the final image. That is why I wanted to share this process with you, especially if you do a lot of pano stitches.
So far, I’ve only done this for straightening difficult off-center horizons, but I can see this filter can possibly be used for some tilt/shift and movements-types of applications too. It’s not necessarily a perfect subsitute for a TS/PC lens or large format equipment, but it’s a cool “digital tilt/shift” solution. The trick is not to go overboard; the adjustments are touchy and if taken too far can severely warp the image’s pixels. The Sheer filter was probably intended to be used more for special effects than correction which is why I warn it should be used only in a slight manner. Nevertheless this process has much untapped potential. Have fun trying it and experimenting on your own images!


 Categories:
Recent Comments